10 Steps to Build a Virtual Machine Images for self-hosted GitHub runner in Azure

Anjali

If you want to run GitHub Actions on your own virtual machines in Azure, setting up a VM image is a great way to save time and keep things consistent. Instead of repeating the same setup every time, you can build an image once and use it to quickly launch new runners with everything already installed. Managing virtual machines (VMs) efficiently is important in the fast-moving world of cloud computing. It helps with scaling, keeping things consistent, and recovering from issues quickly.
In this guide, we’ll walk through the steps to “Build a Virtual Machine Image in Azure” for a self-hosted GitHub runner. This makes it easier to manage your CI/CD workflows and ensures each runner is ready to go right from the start.
What is Virtual Machine (VM)?
A Virtual Machine is a software-based computer running in the cloud, allowing you to run applications and operating systems without needing physical hardware.
- Purpose: To provide on-demand, scalable, and flexible computing power in the cloud without needing physical hardware.
- Uses:
- Run applications and services.
- Host websites or databases.
- Test and develop software in isolated environments.
- Support enterprise workloads and remote desktops.
What is an Azure Virtual Machine (VM) Image?
An Azure VM image is a template containing the OS, applications, configurations, and data needed to create a new VM. It ensures consistency and simplifies the deployment of VMs across different environments. A VM Image is a pre-configured template that contains an operating system and software, which you can use to quickly create new virtual machines with the same setup.
- Purpose: To provide a pre-configured template that helps quickly create new VMs with the same setup and configuration.
- Uses:
- Deploy consistent and repeatable VM configurations.
- Create custom VMs with specific software and settings.
- Quickly scale environments by using saved VM images.
- Save time on setup by using pre-configured OS and application templates.
Uses of Self-Hosted GitHub Runner
Before diving into the technical details, let’s understand why you might need a self-hosted runner:
- Cost Efficiency: Especially for large-scale projects, self-hosted runners can reduce costs compared to using GitHub-hosted runners.
- Custom Environment: Install custom dependencies, tools, and configurations tailored to your project.
- Performance: Dedicated resources mean faster build times, especially for resource-intensive jobs.
Prerequisites
- An active Azure subscription.
- Access to Azure Portal or Azure CLI.
10 Steps to Build a Virtual Machine Image for self-hosted GitHub runner in Azure
Step 1: Understand the Basics
A GitHub runner is a server (virtual or physical) that runs your GitHub Actions workflows. You can host it on:
- Your local machine
- A virtual machine (VM) in the cloud (like AWS, Azure, GCP)
- A dedicated server
In this guide, we’ll focus on setting up a VM image to make deploying the runner easier.
Step 2: Choose Your Virtualization Platform
You can create VM images using platforms like:
- VirtualBox (for local VMs)
- VMware
- Cloud platforms (AWS, Azure, Google Cloud)
Step 3: Create a Virtual Machine in Azure
- Log into the Azure Portal: Open Azure Portal and log into your Azure account.
- Create a VM:
- Navigate to “Virtual machines” from the left-side menu.
- Click “Create” to start creating a new VM.
- Select a subscription and resource group *.
- Fill in the basic details for your VM, such as:
- VM Name*
- Region*
- Availability options
- Zone Options: Self-selected zone/ Azure-selected zone (Preview)
- Availability Zone*: Zone 1/ Zone 2/ Zone 3
- Security Type: Standard/ Trusted Launch VM/ Confidential VM
- Image*: Choose a base image (e.g., Windows Server 2022, Ubuntu 20.04).
- Size*: Choose an appropriate size based on your requirements.
- Administrator Account: Create a username and password or SSH key for login.
- Authentication Type: SSH public key/ Password
- Username*: default name: azureuser
- SSH public key source: Generate new key pair/ Use existing key stored in Azure/ Use existing public key
- SSH key type*: RSA SSH Format/ Ed25519 SSH Format
- Key pair name:
- Public Inbound Ports*: None/ Allow Selected Port
- Click Next to go through the configuration steps (disks, networking, etc.) and Review + Create.
- Configure the VM:
- CPU: 2 or more cores
- RAM: 4GB or more
- Storage: At least 20GB
- Connect to Your VM:
- After the VM is deployed, click on the “Connect” button to either use RDP (Windows) or SSH (Linux) to connect to the VM.
- Click on Download RDP File. Connect the RDP using the credentials you set earlier to log into the VM.
Step 4: Prepare the VM for Image Creation
Before creating an image, you should ensure that the VM is in a “generalized” state (this means that it’s ready to be reused as a template). Connect to VM and follow the below steps.
a. Install Necessary Software:
- Install and configure all the software and settings you want in the image.
- For Windows (Windows x64): Download the Windows runner from GitHub Runner Releases.
- Set up any configurations, network settings, applications, etc.
- Install Required Software: GitHub runners need some basic tools:
- Install Git: sudo apt install git -y
- Install Dependencies: sudo apt install curl jq -y
Step 5: Set Up the GitHub Runner
Once your virtual machine has an OS installed, follow these steps to configure it as a GitHub runner:
- Install Dependencies:
sudo apt-get update
sudo apt-get install -y curl sudo lsb-release
It’s a good practice to run the GitHub runner under a separate user.
sudo useradd -m -s /bin/bash github-runner
sudo su – github-runner
- Go to GitHub Repository:
Navigate to your repo → Settings → Actions → Runners → New self-hosted runner.
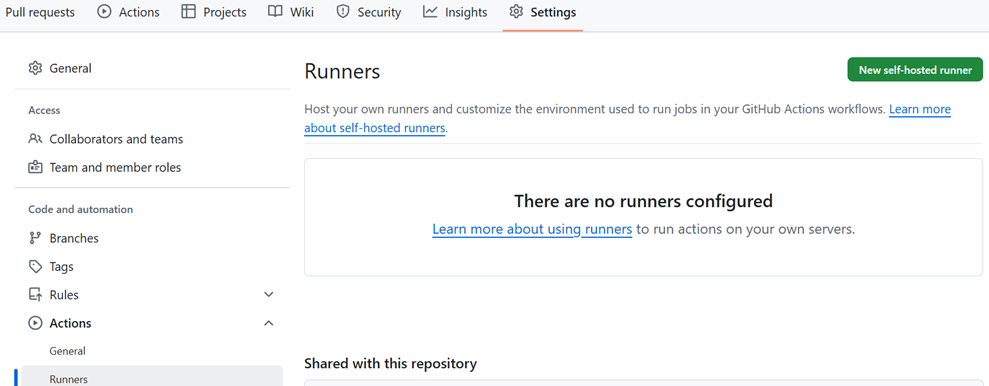
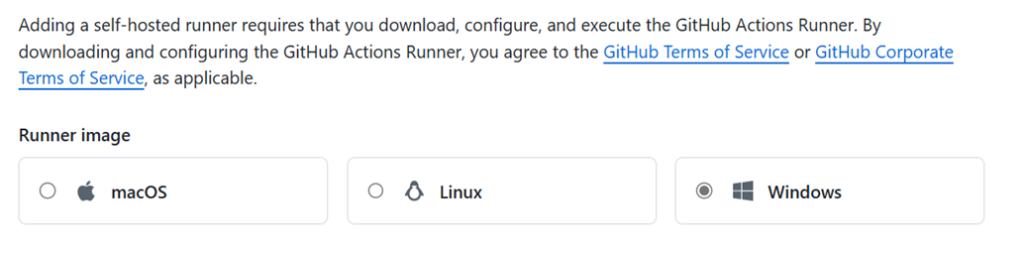
Select Windows option as shown below. You will use the token when setting up the runner on your machine and copy the provided commands. Open PowerShell in admin mode and execute all the commands mentioned in Download and Configure section when you select Windows as shown above.
- Run the Commands in Your VM:
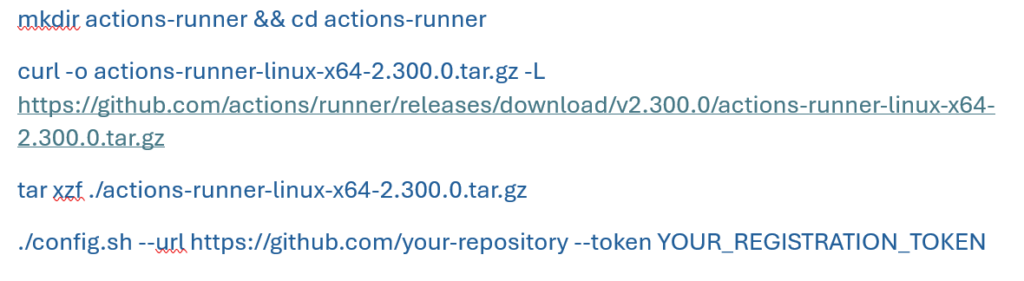
- Install GitHub Runner as a Service (Optional)
If you want your GitHub Actions runner to be always active and start automatically on boot:
For Ubuntu/Debian:
sudo ./svc.sh install
sudo ./svc.sh start
This installs and starts the runner as a system service, ensuring that it runs continuously.
For Windows:
You can use the built-in nssm (Non-Sucking Service Manager) to install the runner as a service on Windows.
Execute the following(powershell):
nssm install GitHubActionsRunner “C:\path\to\config.cmd”
Start the Runner:
./run.sh
The runner will now be active and ready to execute jobs.
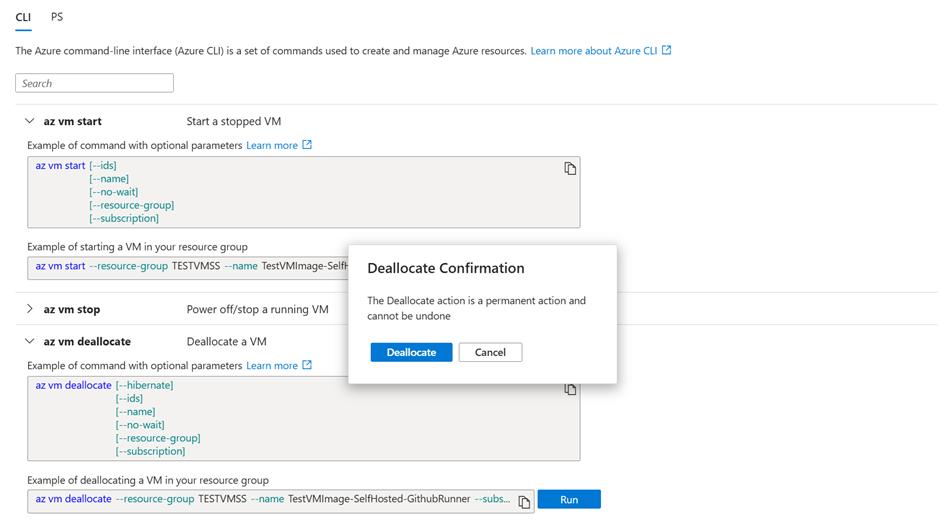
- De-allocate the VM (Optional but recommended):
- In some cases, it’s recommended to deallocate the VM before creating an image.
- Deallocation ensures that the VM is stopped, but the resources are not deleted, which is ideal when preparing to capture the image.
You can deallocate the VM from the Azure Portal or use Azure CLI or PowerShell.
Azure CLI: Open Azure Cloud Shell in the portal. Navigate to CLI/PS tab and look for deallocate command then click on Run.

Step 6: Generalize the VM (Prepare for Image Capture)
To create a reusable VM image, the VM must be generalized using the Sysprep tool (on Windows) or cloud-init (on Linux).
For Windows VM:
· Connect to the VM via RDP.
· Open Command Prompt as Administrator. Change directory to the sysprep folder:
cd C:\Windows\System32\sysprep
· Run the following command:
sysprep.exe /oobe /generalize /shutdown
The /oobe flag will bring the machine to the “Out-Of-Box-Experience” mode, and /generalize removes machine-specific information. The VM will shut down after the process completes.
Step 7: Capture the Image of the VM
Once the VM is generalized, it’s ready to be captured as an image.
- Go to the Azure Portal and find your VM.
- In the VM’s settings page, under the “Overview” section, click on “Capture”.
- Fill in the image details:
- Image Name: Give the image a name.
- Resource Group: Select or create a resource group where the image will be stored.
- Create a new image: Confirm that you want to create a new image from the generalized VM.

- The first option will create the VM Image version which is a specific version of a VM image. It helps you manage different iterations or versions of an image over time, especially when you make updates or changes to the image. Each version refers to a specific state or version of a VM image, typically associated with changes in the VM’s OS, software updates, or configurations.
- Second option will create the VM Image. A VM Image is a template or a snapshot of a virtual machine (VM) that contains the OS and software installed on the VM. It is used to create new VMs that are identical to the original VM from which the image was created. It includes the operating system, installed applications, system settings, and other configurations of the VM.
Click “Create”. This process will create a custom image from your VM that you can deploy later to new VMs.
Note: Please note that when you create a VM image version, it will not appear under the “My Images” section while creating a VM, nor on the “Images” page. Instead, it can be found on the Azure Compute Galleries page.
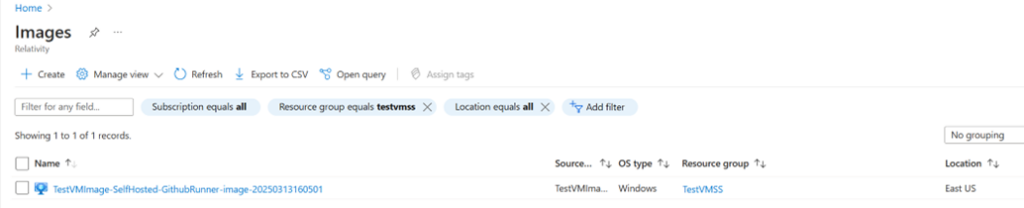
Step 8: Verify the Image and Deploy New VMs from It
After the image is created, it will be available in the “Images” section of the Azure portal, under your resource group.
To deploy a new VM from this custom image:
- Go to “Virtual Machines” in the Azure portal.
- Click “Add” to create a new VM.
- Under the “Image” section, select “My Images” and choose the custom image you just created.
- Proceed with the VM creation process as usual.
- Click on + Create VM to deploy a new virtual machine from the captured image.
- Follow the usual VM creation process (select the VM size, network settings, etc.).
- When you get to the Disks section, select Use an existing image and choose the image you captured.
- Complete the creation process to deploy the VM.
Step 9: Store the Image in Azure
Once the image is captured, it is stored as an Azure Managed Image by default. You can use this image to create new VMs. The image itself is stored as a resource in Azure Storage or as a Managed Image within an Azure Resource Group.
Step 10: Clean Up Resources (Optional)
After successfully capturing the image and using it for new VMs, you may want to clean up resources to avoid unnecessary costs.
1. Delete the Source VM (if not needed anymore).
If you didn’t delete the VM during the image capture, you can delete it manually from the portal or using the Azure CLI:
az vm delete –resource-group <ResourceGroupName> –name <VMName> –yes
2. Delete Unused Storage/Disk (if not used).
If you are storing the image in blob storage, the original disk may no longer be necessary after image capture. You can delete it:
az disk delete –resource-group <ResourceGroupName> –name <DiskName> –yes
Conclusion
Creating a VM image for a self-hosted GitHub runner in Azure helps streamline your CI/CD setup by providing a ready-to-use, consistent environment. Once the image is built, you can quickly spin up new runners without repeating the installation and configuration steps. This not only saves time but also reduces the risk of errors. Whether you’re managing a small project or a large pipeline, this approach brings reliability and efficiency to your DevOps workflow.