How to Implement Data Loss Prevention in SharePoint Online

Chinmoyee

A leading product company leverages SharePoint Online to build a document management system to store its product information and share it with vendors and partners, using SharePoint Online’s external sharing feature. However, the system stores confidential data, such as upcoming product roadmap, product codes and so forth. How can this product company share information but ensure that its confidential data remains protected?
The above scenario is more common than one would imagine in the current seamless anytime, anywhere world of communication. Enterprises to ensure business returns are equipping their employees with content assets in real time and across devices. This immense flexibility has made `data breach’ one of the biggest threats to businesses today.
What is Data Loss Prevention (DLP)?
Microsoft’s Office 365 – Software as a Services (SaaS) platform offers Data loss prevention (DLP), a compliance feature that assists businesses to apply rules to find and protect sensitive data from wrong exposure. DLP policies can be implemented to all data located in Exchange Online, SharePoint Online or OneDrive for Business or can be selectively applied to specific data/accounts/mailboxes.
DLP leverages a content analysis engine to scan through the contents of files/documents /emails and identify sensitive information such as passport number, credit card number, bank account number, etc. Upon detection of data of a sensitive nature, action can be taken for the file, leveraging the configured DLP policy.
DLP policies configured with necessary condition and pattern can be leveraged to selectively restrict content from sharing with external users in the same site.
Simple Process to Protect Data with Data loss prevention in SharePoint Online
Going back to the example of the product company, here are a few high-level steps to configure DLP policy and associate the same to a SharePoint Online site.
- Product codes for all upcoming/in development products will be in the format: UPC-<<4 digit number>>. Once the product gets released, the code gets changed, and information shared with vendors will only contain the released product code.
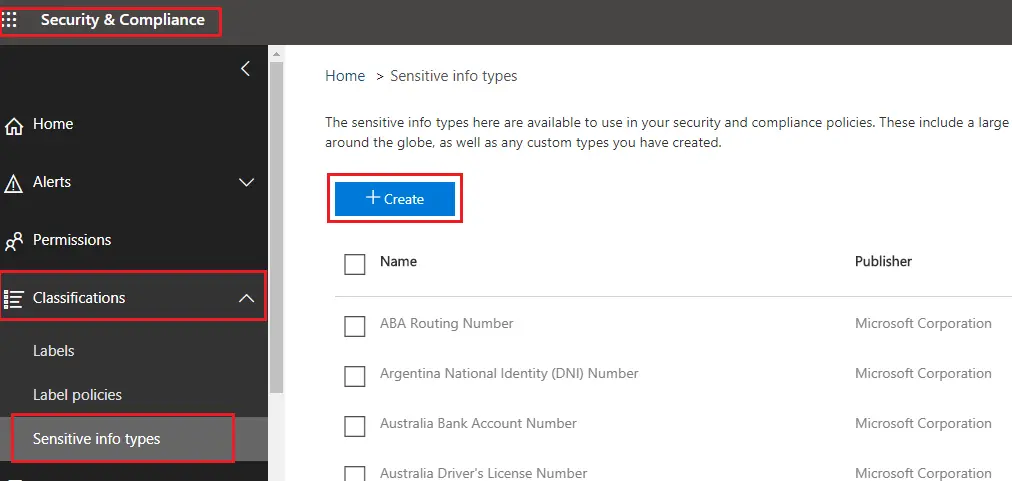
- Login to Microsoft 365 Admin center with tenant Admin credentials and navigate to “Security & Compliance” Admin Center.
- In “Security & Compliance” Admin Center, expand Classifications and click on “Sensitive Info Types.” There are 90 sensitive information types published by Microsoft which can be used in DLP policies. However, for the above use case, we will create a new sensitive info type.
Creation of new Sensitive Info type:
- Click on “Create” Sensitive Info Types
2. Key in the name and description of the type of sensitive information.
3. Requirements for matching is crucial and should be configured correctly. This will ensure that data gets detected correctly using DLP policy.
Here, we will be using two pattern elements:
a) Regular Expression as a primary pattern element
As the product code for upcoming products will have a pattern such as– “UPC-<4 digit number>”, we are configuring regular expression to detect content as – UPC-[0-9]{4}
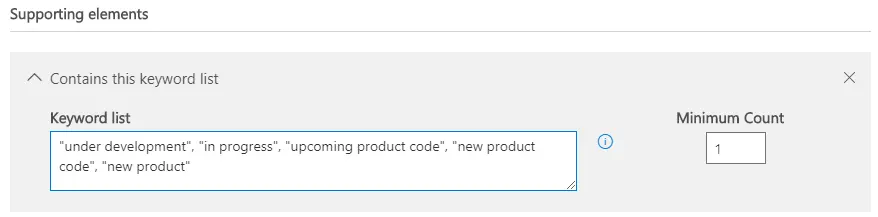
b) Keyword as a secondary pattern element. Please note that this is not mandatory
For the above use-case, we are configuring keywords as below with minimum count as 1 (meaning if there is at least one instance of the configured keyword, the policy will be triggered)
Here, we will keep the default confidence level -60%. This defines the match confidence of the configured pattern. Also, character proximity is set to 300 that means that if the configured keywords are detected within 300 characters of where there was a match on the regular expression, it will be considered as a positive match.
Once the matching elements are configured, review the sensitive info types and click on Finish. After creation of the sensitive info type, the same can be tested by uploading a sample file containing confidential information.
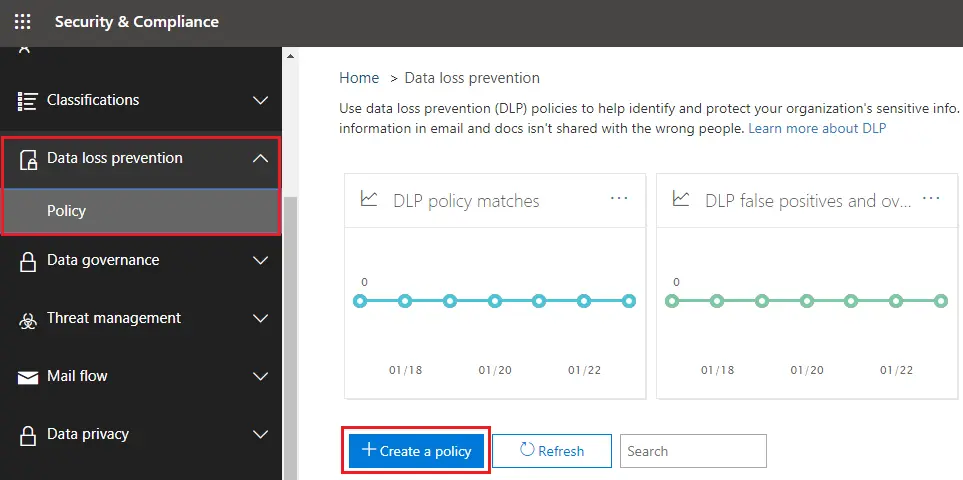
Creation of Data Loss Prevention Policy:
In “Security & Compliance” admin center, expand Data loss prevention and click on Policy. Click on “Create a Policy”.
During the creation of the policy, key-in all the required information:
1. The policy can be created with existing inbuilt templates, or a custom policy can be created from scratch. Here, in this case, we will be creating a custom policy from scratch.
2. Key in name and description of the policy and click on Next
3. Choose locations. DLP Policy will protect content stored in selected locations. By default, all locations in Office 365 (Exchange mail, OneDrive, and SharePoint documents) will be considered. However, locations can be filtered as per the need. In this case, we will select the location as SharePoint Sites. Additionally, all SharePoint sites can be included, or a specific site(s) can be included
4. Next step is Policy Settings, and we need to customize the type of content we want to protect
a. Find content that contains – Add a configured Sensitive info type or Retention Label
We will set the newly created sensitive info type (Company A Product Code) as the detectable content. We will leave the default match accuracy – min 60 and max 100)
b. Detect when this content is shared – with external sources not belonging to the company. Our use case is for external sharing. Hence we have configured the setting as content that is shared with external sources.
5. Configure the action to be executed when sensitive information is detected
a. Select the settings to notify users when the content matches policy settings. Here the set of people to be notified, email text and policy tips can also be customized.
b. Configure to detect sensitive content when at least one instance f the same sensitive info type is shared
c. Send incident reports by email to notify when an incident is detected. Here people to be informed can be customized. Additionally, information to be shared as part of the report can be filtered
d. Restrict access to encrypt content. In the case of the mailbox, we can set the settings to encrypt content. For the above use case, we will select the setting to block access. Since we have chosen the option to detect when content is shared with external people, access will be blocked for external people. However, in the next settings page, we will have the option to customize access and override permissions
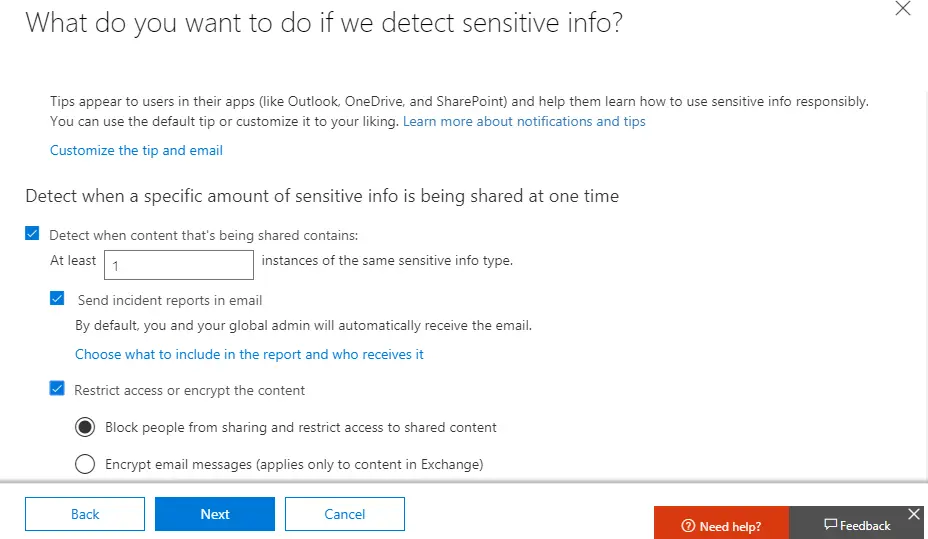
e. Use the option to allow override of policies. This feature can be switched on or off. In this case, we are switching off this settings
f. Once the policy to detect settings is configured, we can select the option to test it out or turn it on directly or keep to turn to later
6. Once all settings are done, we can review and save the configuration.
Verification of DLP Policy in SharePoint Online site:
1. Navigate to a document library in the SharePoint Online portal where the DLP policy needs to be verified
2. We will upload two files –
a. One with sensitive information containing product code with the desired format and,
b. Another one containing product code in a different format
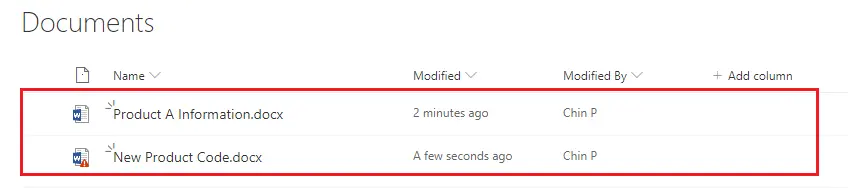
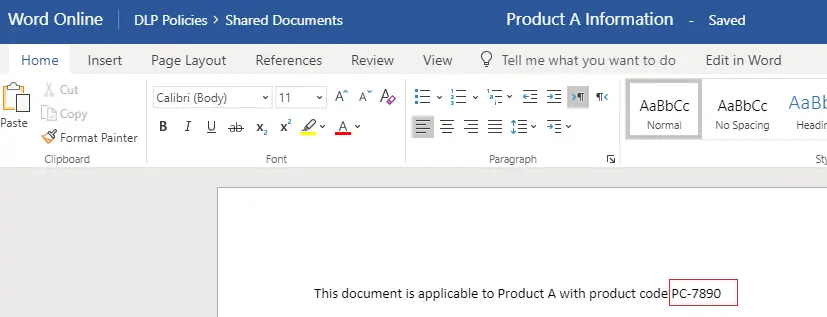
The document named “Product A Information” contains information about a released product and product code is different, and hence DLP policy is not applied.
However, the document named “New Product Code” contains code with the desired format for a under development product and hence DLP policy is applied.
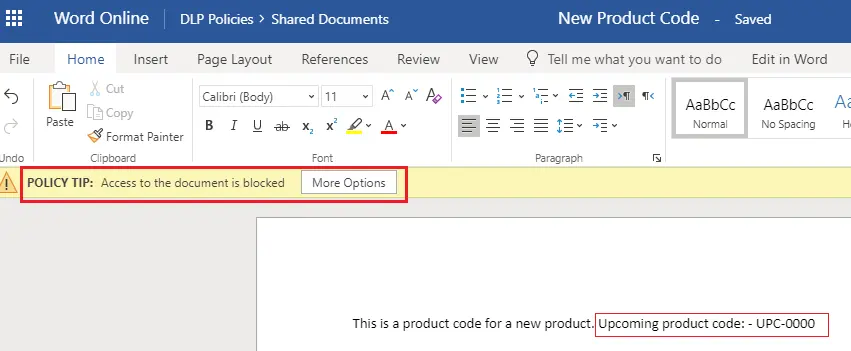
Additionally, the document for which policy is triggered will not be allowed to be shared with external users.
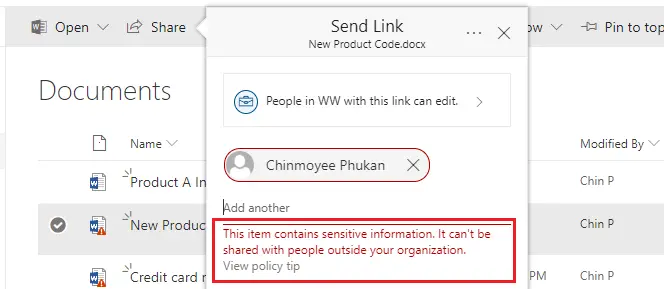
Even if an external user has full access to the site, they will not have access to restricted documents. Also, admin or configured users will be notified upon detecting a sensitive document via DLP policy. This completes the configuration of DLP policies and triggering of policies in a SharePoint Online site.
Conclusion:
To summarize, sensitive information and DLP policies can assist organizations to protect confidential information from unwanted external parties. This is an excellent functionality to detect data breach of protected information. It reduces development and maintenance effort by triggering custom code for applying item level permission and restriction of sharing selectively.