Integrate External Services with Microsoft Teams via Custom Bot

Chinmoyee
Microsoft Teams is a chat and collaboration platform in Office 365. Along with chat-based workspace, Microsoft Teams’ integration with other Microsoft services and various other familiar office applications lets users share files, schedule meetings, collaborative editing, and easy switching between voice, video and text chat.
Microsoft Teams facilitates easy collaboration by bringing together people, conversations, and content. On creation of a team, it internally creates an Office 365 group (or also team can be connected to an existing group), and in turn, a SharePoint team site is provisioned for the group.
The service allows members of a Team to provision a hub for group chat rooms which are called channels. Multiple channels or chat rooms can be provisioned within a team. Files shared within a Team will be stored in the SharePoint team site’s document library with a folder representing every channel.
Each Microsoft team can have one or more channels which can be set up for specific projects, topics, or business teams, within allows chatting, share files, and interact with external services via Tabs, chat Bots and O365 Connectors. Each channel will be provisioned with a few built-in tabs while new tabs can be created and added. Teams also will be shipped with multiple connectors and Bots, which can take part in the communication.
Today I am going to pin down the details on the ability of Microsoft Teams to extend via the creation of custom “chat bot” that leverages Microsoft Bot Framework. Let’s consider the below scenario for the creation of a “chat bot” to communicate with the external service:
Let’s say you have created a Microsoft Team for the “Finance” team of your organization. The Finance team has thousands of documents stored in the Azure Blob Storage. While communicating within a channel in the Team, the members of Finance Team might need to fetch the document based on a certain keyword instead of going back to some other portal to look for the document. Even the team members may need to have 1:1 chat to fetch finance documents from Blob Storage. To carry out this requirement, we can design and develop the custom bot which fetches documents from Azure Blog Storage via Azure Search service. The documents can even be retrieved from a SharePoint document library.
Below are the high-level steps to incorporate the above requirement:
1. Create and register the bot in the Bot Framework
2. Design and develop the bot leveraging Microsoft Bot Framework which talks to Azure Search service
3. Test the Bot using Emulator
4. Publish the Bot to Azure App Service
5. Update the Azure App Service URL for the registered Bot in the Bot Framework and test the Bot again using Emulator
6. Create a sideloadable bot package
7. Sideload the bot to the Team
8. Accessing the sideloaded Bot
Let me explain the above steps in details:
Create and register the bot in the Bot Framework: Register the bot with Microsoft Bot Framework. This will generate a new App ID and Password which will be required in the next steps. At this point, skip the messaging endpoint and this needs to be updated in the later stage.
Design and Develop the Bot: The Bot can be built using the C# SDK, Node.js SDK or Microsoft Bot Connector API. For this scenario, I have used C# SDK and created a new project using the Bot Application template. The Bot Application template needs to be added to Visual Studio template folder to create a new Bot project. The template can be downloaded from here and then the zip file (Bot Application.zip) needs to be placed into the Visual Studio template folder (usually located in “%USERPROFILE%\Documents\Visual Studio 2015\Templates\ProjectTemplates\Visual C#\”)
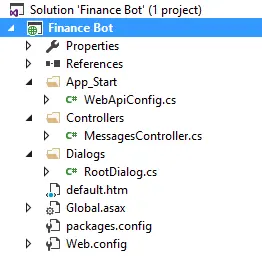
The initial Bot Application project structure is as below. The Bot Application is just an ASP.Net Web API with messages end-point defined in the MessageController class.
The App ID and Password generated in step 1 needs to be updated in the web.config file of the Project.

Most of the actions in the Bot are handled in the Post method in the MessageController class. All the messages from the end users and replies to the messages are controlled in this method. Upon receiving a message (which is passed in the form of Activity) from the end user, it checks the type of message and accordingly handles it. There are various activity types built into the bot framework.
Here, in the Post method, we are validating if the activity type is “Message”, which represents a communication between the Bot and the end user. If the activity type is “Message” we are invoking the RootDialog class, which extracts the message from the end user, invokes the Azure Search service to search documents from the Azure Blog Storage. On retrieval of the corresponding document link from the search service, the Bot will return the document link as a reply to the end user.
Handling of the message and returning the reply to the user:

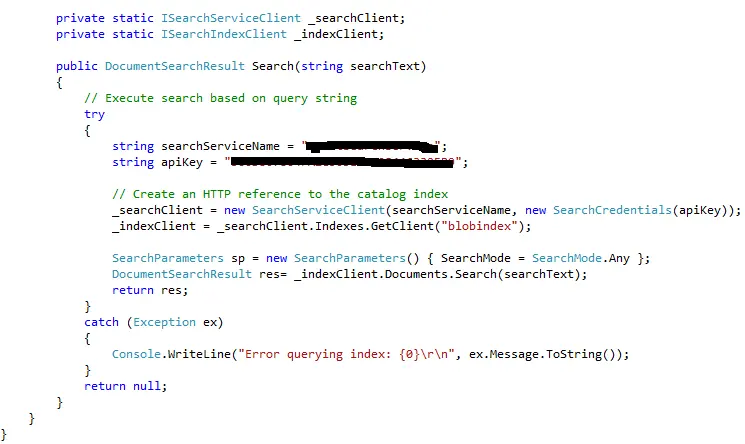
Searching document using the message as the keyword from Azure Blog Storage via Azure Search Service:
Test the Bot using Emulator: Once the Bot Application is set up, run the application which will then open a new browser with the localhost URL for the Bot. The Bot’s endpoint also will be displayed on the screen. Now, we need to launch the Bot Framework Channel Emulator (can be downloaded from here) to test the Bot locally.
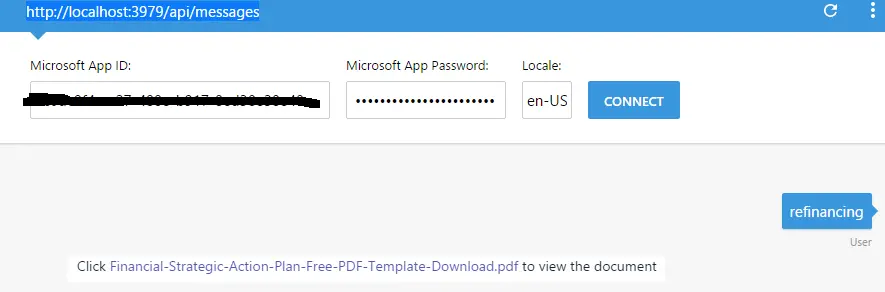
In the Emulator, we need to feed in the local endpoint for the Bot, App Id and Password (if App Id and Password is not configured in the web.config file, those are not required to be fed into the Emulator)
‘
Here, the end user wants to find the documents containing the keyword “refinancing”. The Bot calls the Search service, fetches the document(s) and send as a reply to the user. The Emulator also displays the logs which can be used to check the JSON behind each log. Now, as the Bot is sending a reply to the end user, it indicates the Bot is set up correctly and we are ready to publish to Azure!
Publish the Bot to Azure App Service: We are all set to push the Bot to Azure so that it can be consumed in our Microsoft Teams service.
In the Bot Application Project, we need to set the publish target to publish it to Azure App. If Azure App service is already configured, we can import the profile of the same from Azure Portal and import it to the solution or we can create a new one.
Once the Bot is published to the App Service, the default page of the Bot will be opened in the default browser. This URL will be required in the next step to update in the Bot Framework.
Update the Azure App Service URL of the Bot to Framework: At this step, we need to go back to the Bot Framework and update the messaging endpoint of the Bot that we have registered in the first step. The messaging endpoint URL should also contain “/api/messages”.

We can click on the Test button to validate the connection of the Bot. Also, we can validate if the Bot is sending replies to our messages in the Chat section.
Create a sideloadable Bot package: The sideloadable package is a zip file containing the below resources:
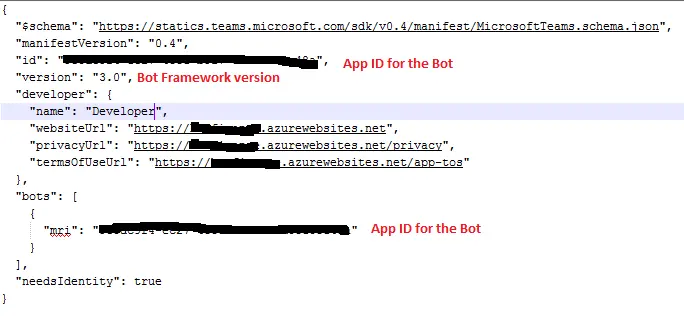
• Manifest.json: This file specifies attributes of the bot. The structure of the file looks like below:
• Any images which need to be used for the Bot
Once the manifest.json file is set up, we need to package it as a zip file
Sideload the Bot to the Team: For performing this step, the settings for allowing Sideloading of external bots & tabs should be turned on in Microsoft Teams O365 Admin Center.
Now we are all set to upload the sideloadable package to the Teams. We need to launch Microsoft Teams, select the team and click on View team from the ellipses. Under the Bots section, there will be a link called “Sideload a bot or tab”, we need to click this link to upload the Sideloading package created in the previous step.

Once the Bot is sideloaded it will be displayed in the list under Bots section.
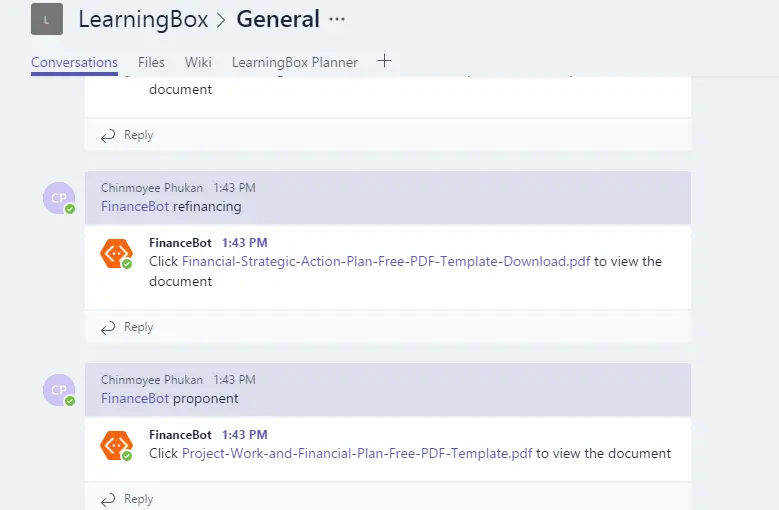
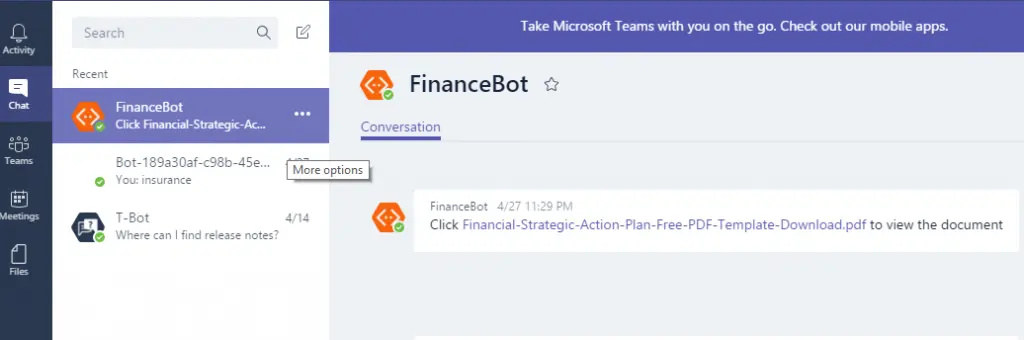
Accessing the sideloaded Bot: Once the Bot is added to the Teams, it can be used by all team members inside or outside channels. The Bot can be invoked by @mentioning the name of the Bot. Once the Bot is mentioned in a channel, it can be used directly for 1:1 chat
Also, the Bot can be used for 1:1 chat.
Conclusion–
During the course of this post, we have registered the Bot, developed it, published the same to Azure App service and finally consumed the Bot in Microsoft Teams. And with this set up we were able to talk to the Bot through Teams service. We can also create various other intelligent Bots and integrate the same with multiple other channels like Skype, Facebook Messenger, and Slack etc.