MOSS 2007 to SharePoint 2013: Migration using Database Attach Method

Pankaja

In one of my projects, I got a chance to work on the migration where we have migrated contents from MOSS 2007 to SharePoint 2013 environment with the huge content of about 40+ databases and 11000+ sites. We had decided to start the upgrade process using the database attach method as this is the only supported method for upgrading from MOSS 2007 to SharePoint 2013 without much of complications.
Let me tell you, we cannot upgrade the content directly from MOSS 2007 release to SharePoint 2013. The changes between versions are too great, and the hardware requirements differ so much between versions that a direct upgrade is not possible or supported. However, we can perform a series of database-attach upgrades to first upgrade our content to SharePoint 2010 Products and then to SharePoint 2013. The upgrade method is almost similar from MOSS 2007 to SharePoint 2010 and then from SharePoint 2010 to SharePoint 2013.
This blog describes how to perform these sequential database-attach upgrades from MOSS 2007 to SharePoint 2010 and then to SharePoint 2013.
Run preupgradecheck in MOSS 2007 Server
Preupgradecheck will provide us the invaluable information regarding the SharePoint 2007 farm and actions that may be required to be taken prior to upgrading to SharePoint 2010/SharePoint 2013
Run the preupgradecheck as below in command prompt:
stsadm.exe -o preupgradecheck
Once you get “Operation completed successfully”, it will launch the “SharePoint Products and Technologies Pre-Upgrade Check Report”. It can also be located under the following location;
%COMMONPROGRAMFILES%\Microsoft Shared\Web Server Extensions\12\Logs\
Analyze the report and Fix the following settings:
• Identify any third party components used and deploy them to SharePoint 2010 and SharePoint 2013 site. E.g. Nintex, 3rd party features, including web parts, solutions and custom workflows
• Setup Incoming/Outgoing email settings in SharePoint 2010 and SharePoint 2013environment
• Modified Web.Config entries
• Configure Alternate Access Mappings (AAM)
• Find the missing webpart, event receivers or features if any and delete them
Take the Content Database Backup from MOSS 2007
Set the databases to read-only before taking backups.
• On the MOSS 2007’s database server, click Start, point to All Programs, Microsoft SQL Server, and then click SQL Server Management Studio.

• Traverse to Databases node by expanding the tree
• Right-click the name of the database that you want to set to read-only, and then click Properties.
• In the Properties dialog box, click the Options tab.
• Under State, select the Database Read-only to True, and then click OK
Backup the database:
Follow these steps to take back-up:
• Traverse to Databases node by expanding the tree.
• Right-click the database you want to back up, point to Tasks, and then click Backup Database
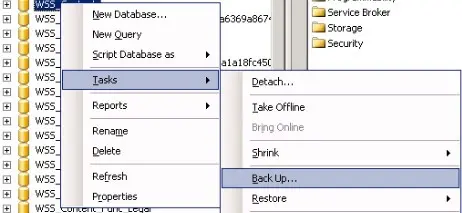
• In the SQL Server Backup dialog box, specify a name for the backup, select Back-up type – Full, select a destination, and then Click OK to start the backup process.
Restore the Backup on SharePoint 2010 SQL server
• Open the SQL Server Management studio, traverse to “Databases” node. Then right click the “Databases” node and choose “Restore Database…” from the context menu.
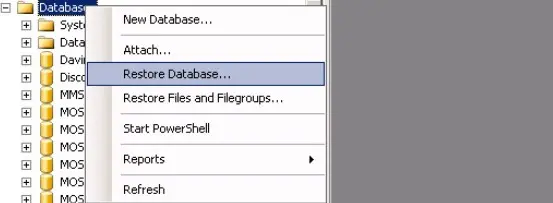
• Specify the Database name, Restore Source, Destination, File names in the screens.
• Click “OK” to start the restore operation and Wait for the restore to complete! The time of restoring database depends upon the database size and server’s capacity.
• Make the Read-Only database to false after restore
Create web application in SharePoint 2010
• In the SharePoint Central Administration, click on “Application Management” and click on “Create or extend Web application” under “SharePoint Web Application Management”.
• Again click on “Create Web application”. Set the settings according to the need.
• Don’t create any site collection.
• Install & Copy the solutions, file system changes (like images, themes) from MOSS 2007 to SharePoint 2010 server.
Remove content database of the newly created web application in SharePoint 2010
Now, we need to delete the content db of the newly created web application in order to avoid any URL conflicts. Run the below stsadm command:
stsadm -o deletecontentdb -url <http://url> -databasename <MOSS2007_Migration_Content>
Attach restored database with the newly created web application in SharePoint 2010
• Test the content database: Before attaching the content databases to the Web applications, use the Test-SPContentDatabase PowerShell cmdlet to verify that all of the custom components that you need for that database. It checks for all artifacts such as feature, setup files, web parts etc. that are referred in the content database are installed in the farm and provide you with a report.
• Test-SPContentDatabase -Name <DatabaseName> -WebApplication <URL>
• Delete the corrupted objects
• stsadm -o databaserepair -url <URL of SharePoint site> -databasename <name of database> -deletecorruption
• Attach the Content DB to Webapplication
• Finally, we need to attach the restored MOSS 2007 database to SharePoint 2010 by running the STSADM command
o The Content DB containing the root site collection is always applied first.
o The other content DBs can be applied in any order. Attach the Content DB of the Root Site collection First. And then Attach the Content DBs of other Site Collections.
stsadm.exe -o addcontentdb -url <URL of SharePoint site> -databasename <MOSS2007_Portal_Content>
• Or you can use the PowerShell cmd-let: Mount-SPContentDatabase
Mount-SPContentDatabase -Name <DatabaseName> – databaseServer <ServerName> -WebApplicationURL
Migrate from Classic Mode to Claims mode
SharePoint 2013 authentication mode is by default Claims mode, so during migration from any previous versions, make sure to migrate authentication from Classic to Claims mode. If the authentication type is Claims already, then ignore this step.
Refer this Tech-net guide on how to migrate to claims – http://technet.microsoft.com/en-us/library/gg251985.aspx
Post Migration fixes
Once the content database attachment process is over, we have to manually fix the below things:
• Migrate any List/Site stp’s present from previous version to next version
• Migrate InfoPath forms and change the url ’s to the new url and then publish forms
• Perform the Visual upgrade to get the look and feel of the next version
o Following are the commands used in PowerShell to do visual upgrade
o SharePoint 2010 visual upgrade using PowerShell
//Use this for entire webapplication
$w = get-spweb http://server/site
$w.webs | ForEach-Object {$_.UIversion = 4; $_.UIVersionConfigurationEnabled = $false; $_.update()}
//Use this for individual site
$web = Get-SPWeb http://server/site
$web.UIVersion = 4
$web.UIVersionConfigurationEnabled = 0
$web.Update()
SharePoint 2013 visual upgrade using PowerShell
Upgrade-SPSite “http://server/site” –VersionUpgrade
Similarly to migrate content from SharePoint 2010 to SharePoint 2013, follow the steps from 1 – 8. Once all the operations are done, browse the migrated site and check the functionality.
References:
http://technet.microsoft.com/en-us/library/ee947141(v=office.15)
http://www.sharepointdiary.com/2013/09/migrate-from-sharepoint-2010-to-2013-step-by-step.html