Introduction to Puppeteer UI Automation

Vincent
Writing scripts for online scraping, testing, and monitoring might be challenging in this day of cutting-edge technologies. Because of this, the Google Chrome team has created a tool called Puppeteer that enables you to programmatically utilize JavaScript/TypeScript to carry out routine activities on the Chromium or Chrome browser. In this blog, we will explore how to use Puppeteer UI Automation tool.
What is Puppeteer?
Puppeteer is a Node library which provides a high-level API to control Chrome or Chromium over the DevTools Protocol. Puppeteer can be set up to run full (non-headless) Chrome or Chromium instead of the default headless mode.
What can be done using Puppeteer?
Puppeteer can perform most tasks that you may perform manually in the browser! Below are few examples,
- Test a SPA (Single-Page application)
- Automate any action in the browser, similar to Selenium
- Generate pixel-perfect PDFs from webpages
- Very fast testing through the DevTools protocol
- Capture a Timeline Trace of your site, to diagnose performance issues
- Integrates with other test frameworks such as Jest, CodeceptJS, WebDriverIO and others
Let’s scrape a job portal to show how Puppeteer functions. It’s simple to do and will help us comprehend web scraping in general.
Benefits of Puppeteer UI Automation
- Interaction with Website: One of the key benefits of using Puppeteer is its ability to interact with a website in the same way that a human user would. This makes it an ideal tool for automating UI testing, as it allows you to simulate user interactions and check that the website is behaving as expected.
- Flexibility: Another benefit of Puppeteer is its flexibility. It allows you to write code in JavaScript/ TypeScript, which is a popular and widely-used programming language. This means that developers/testers who are already familiar with JS or TS can quickly get up to speed with Puppeteer, and there is a large community of developers who can provide support and share their knowledge.
- Wide Range of APIs: Puppeteer also provides a wide range of APIs for interacting with web pages. For example, you can use it to click buttons, fill out forms, and even take screenshots of web pages. This makes it an ideal tool for automating a wide range of UI testing tasks.
- Easy to Use: When it comes to setup and configuration, Puppeteer is relatively easy to get started with. It can be installed via npm, and you can run it in a headless mode, which means that it runs in the background without needing to open a browser window. This makes it an ideal tool for running automated tests on a continuous integration server.
Setting up a Node project
Let’s take a screenshot of an application using puppeteer by setting up node.
- Install Node.js or latest
- Install yarn or npm
- Run the below command in cmd

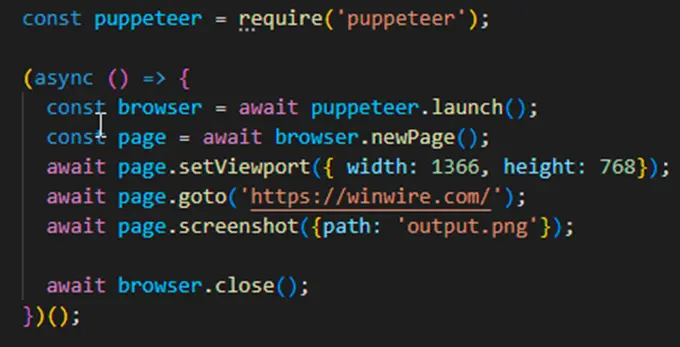
Create SamplePuppeteer.js file. Add the following codes inside the script file you have created
Run the file from the terminal using this command

Above code will capture a screenshot of WinWire.com home page and store in the same location as the js file.
Same way puppeteer can be used for web scraping or extract a full pdf of the webpage.
What is Puppeteer Recorder?
Now that we know what Puppeteer is and what it can do, let’s look at an important usage of Puppeteer: automated testing.
We can record our browser interactions and activities with the help of the Chrome plugin Headless Recorder, which will then produce a Puppeteer script for automated testing.

The free extension makes writing Playwright/Puppeteer scripts way easier. It records your browser interactions and auto-generates the code. This is super useful for creating:
- E2E test scripts
- Web scraping scripts
- Synthetic monitoring scripts
Headless Recorder features:
- Record clicks, input events, etc.
- Record screenshots.
- Pause the recording when navigating.
- Identify elements from the overlay.
- Monitor recorded events.
- Export to Puppeteer code
- Tweak the settings of the generated code.
How to use it:
- Click the icon and hit Record.
- Hit TAB after you finish typing in an input element.
- Click links, inputs and other elements.
- Wait for full page load on each navigation.
- Click Pause when you want to navigate without recording anything. Hit Resume to continue recording.
You can stop the recording completely with Stop button. Finally copy the generated script clicking on Copy to Clipboard.
Using Jest with Puppeteer
Before starting with automation testing with Puppeteer, let’s see about Jest framework which can be used with puppeteer to achieve this.
You can begin utilizing Jest if your app uses NestJS, GraphQL, or any other well-known JavaScript framework.
It offers a feature-rich API, quick installation and use, simple test mocking, and snapshot functionality. Jest can execute your tests concurrently, provides excellent error reporting, and allows for isolated test runs.
There’s a project called Jest Puppeteer, which allows QA and developers to run tests created for Jest with Puppeteer. It offers an easy way to run your tests with Puppeteer and provides specific matchers, tailored to Puppeteer, called expect-puppeteer.
The project provides a Jest preset, called jest-puppeteer which you can add in your Jest configuration file (jest.config.js).
To install jest-puppeteer run below command.

With this you can also install puppeteer-core which is a light version of Puppeteer with the below command

Puppeteer UI Automation
UI testing is a process used to test if the application is working as expected. UI testing can be done by testers, or it can be automated with the help of software program.
There are many tools to achieve this, such as Selenium, TestComplete or SoapUI etc., but we will demonstrate how to achieve this with Puppeteer.
Puppeteer is used for performing browser-specific tasks such as accessing web pages using DOM API, automating form submissions, keyboard inputs, etc. which are helpful in performing automated UI testing for Chromium browsers.
Sample Puppeteer Typescript code
Let’s search for data in WinWire site using puppeteer by performing below steps:
- Navigate to WinWire site
- Click on Search logo
- Type ‘puppeteer’
- Hit Enter button
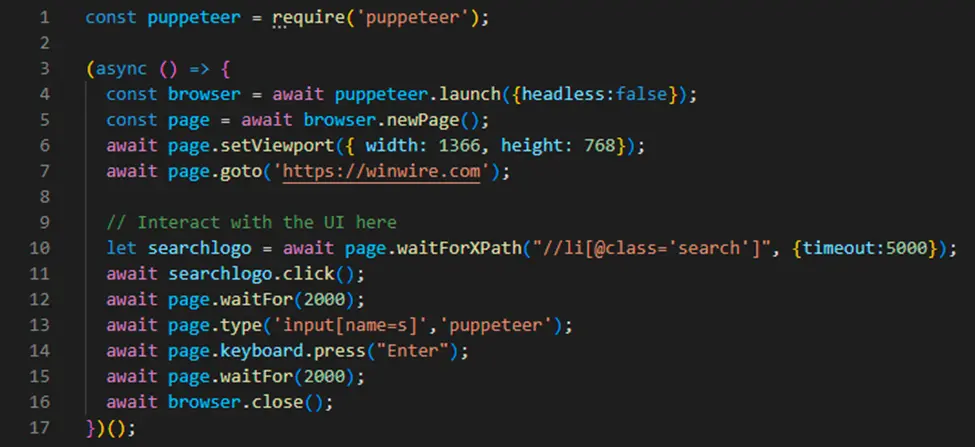
Create PuppeteerUITest.ts file. Add the following codes inside the script file you have created.
Run the above code with below command

This code launch the browser with puppeteer, navigates to the given website, types ‘puppeteer’ into a search input field with name ‘s’ and perform keyboard action { Enter }.
First, the code imports the Puppeteer library using the require method. Then, it uses an immediately invoked async function to execute the following steps:
- Launches a new instance of Google Chrome with the puppeteer.launch() method, with the headless:false option which means the chrome browser will be visible when the script runs.
- Opens a new tab in the browser using browser.newPage() and assigns it to the variable page.
- Sets the viewport of the page to a width of 1366 and a height of 768 using page.setViewport().
- Navigates to the website “https://winwire.com” using page.goto().
- Waits for the search logo element to be present on the page using page.waitForXPath(), with a timeout of 5000 milliseconds.
- Once the element is present, it clicks on the search logo element.
- Waits for 2 seconds using page.waitFor().
- Types ‘puppeteer’ in the search box and press enter key.
- Waits for 2 seconds using page.waitFor().
- Closes the browser using browser.close().
Puppeteer with Jest
Above code can be used with Jest framework automation by following below steps
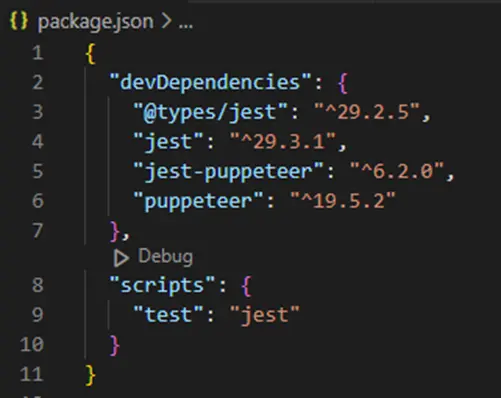
Install Jest using package manager:

Add the following section to your package.json
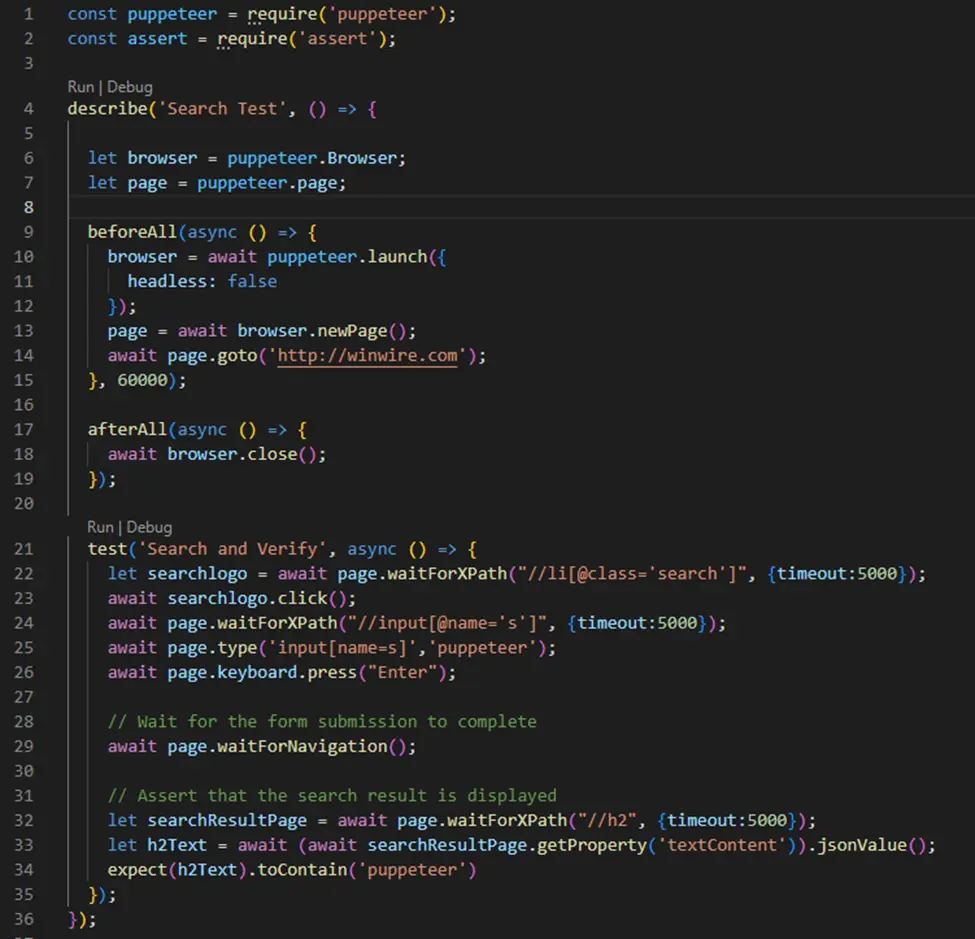
Then, create a file named puppeteerJest.test.ts. This will contain actual test:
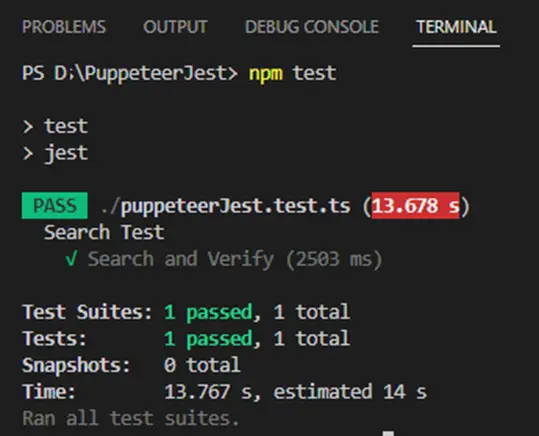
Output of this code execution will be displayed in the command terminal as below with number of Test Suites passed with total Test Suites and number of Tests passed with total test executed.
The code defines a test suite called “Search Test” which contains one test case called “Search and Verify”. The ‘beforeAll’ function is called before the test case runs, it launches a browser using Puppeteer’s launch method, and opens a new page using the newPage method. Then it navigates to the website www.winwire.com
In the test case, it first waits for an element with an XPath of “//li[@class=’search’]” to appear on the page, and clicks on it. It then waits for an input field with an XPath of “//input[@name=’s’]” and enters the text “puppeteer” into it. It then presses the Enter key on the keyboard to submit the form.
It then waits for the page to navigate to the search results page and then waits for an element with an XPath of “//h2” to appear on the page. It gets the text content of the element and checks that it contains the word “puppeteer” using the Jest’s expect function.
The ‘afterAll’ function is called after the test case is completed, it closes the browser.
In this way, the code is using Puppeteer to interact with the website, Jest to structure and run the test.
Automation framework
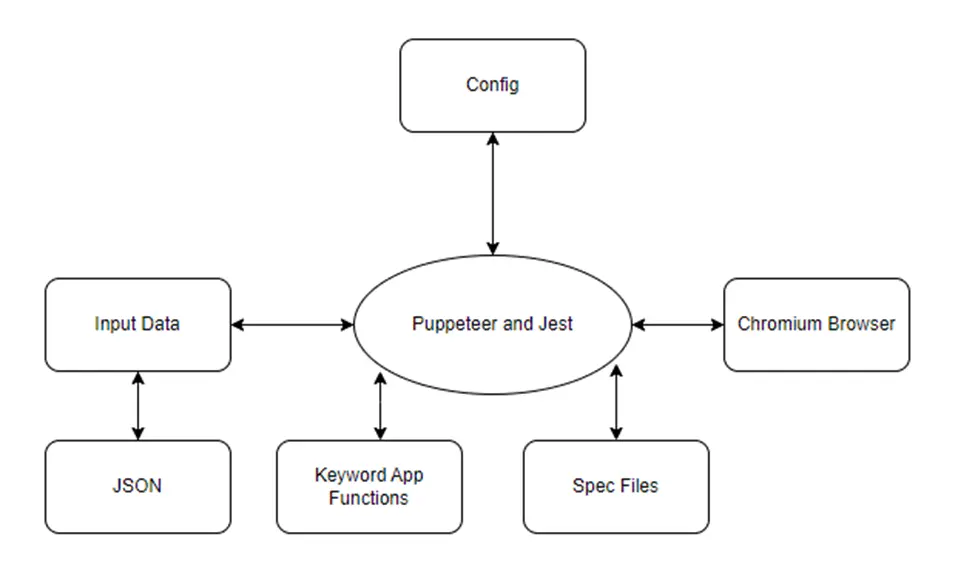
Combining Puppeteer and Jest tools would allow for the creation of a hybrid automation framework that uses Puppeteer for browser automation and Jest for test execution and assertion. This would enable testers to write automated tests for web applications that can interact with the browser just like a user would and also to use the Jest to run the tests and give the test results.
Below architecture diagram show a simple hybrid framework created using these tools
Conclusion
Puppeteer is a powerful and flexible tool for automating web UI testing. Its ability to interact with web pages in the same way that a human user would, combined with its flexibility and wide range of APIs, make it an ideal tool for automating a wide range of UI testing tasks. Its ease of setup and configuration also makes it a great choice for testers and developers who want to quickly get started with automated testing.