Setting up the Development Environment for Angular 2

Krishna

In this article, we will gain understanding on how to setup a local development environment for Angular 2. This blog covers minimum required configuration for creating applications in Angular using Typescript and ES5.
Here, I will be providing a step-by-step approach to setup an environment.
Angular 2 is an open source JavaScript framework to build web applications in HTML and JavaScript.
The setup of Angular 2
Steps:
1. Install Visual Studio Code (IDE, but you can use pretty much anything you want)
2. Install NPM (Node.js Package Manager)
3. Install TypeScript
4. Create tsconfig.json
5. Create typings.json
6. Create package.json
7. Install Angular 2
1) Install Visual studio code or visual studio 2015.
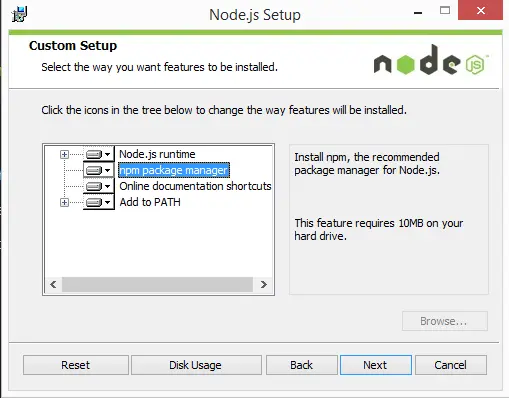
2) Install NPM(Node.js Package Manager)
• Download the Windows installer from the Nodes.js® web site.
• Run the installer (the .msi file you downloaded in the previous step.
• Follow the prompts in the installer (Accept the license agreement, click the NEXT button a bunch of times and accept the default installation settings).
Restart your computer. You won’t be able to run Node.js® until you restart your computer.
3) Installing TypeScript
In angular 2.o Apps I am using TypeScript, so we will have to install it via npm: (-g means that it will install it globally). I am using Windows, so to run the npm you will have to run the cmd (command prompt). Go to your cmd and execute this command.
npm install -g typescript
TypeScript is not required to write Angular 2, but I have chosen this option because of the type system it offers and if you are coming from C# it is really easy to get used to it, you can pretty much write your Angular 2 app using normal ECMAScript 5 (standard JavaScript where most of the apps are written), but I guarantee you that it will look really ugly!
you can see it here: %AppData%/npm/node_modules/typescript
4) Creating tsconfig.json
What is the tsconfig.json file?
The presence of a tsconfig.json file in a directory indicates that the directory is the root of a TypeScript project. More info(http://www.typescriptlang.org/docs/handbook/tsconfig-json.html)
The tsconfig.json file specifies the root files and the compiler options required to compile the project. A project is compiled in one of the following ways:
Using tsconfig.json
• By invoking tsc with no input files, in which case the compiler searches for the tsconfig.json file starting in the current directory and continuing up the parent directory chain.
• By invoking tsc with no input files and a –project (or just -p) command line option that specifies the path of a directory containing a tsconfig.json file, or a path to a valid .json file containing the configurations.
Make sure you run this command in your project folder directory using cmd (command prompt), because it will create for us the file tsconfig.json (after executing the command) that stores the TypeScript compilation options. You can see the tsconfig.json from the Visual Studio Code when created.
tsc –init –target es5 –sourceMap –experimentalDecorators –emitDecoratorMetadata
The tsconfig.json file contains TypeScript compiler configuration parameters
the structure consists of two sections. The first section is named compilerOptions and contains command line options which are passed to the TypeScript compiler every time the program is executed. The second section exclude is an array of folders and files in the project directory which should not be processed by the TypeScript compiler and it makes sense to exclude the node_modules directory.
5) Creating typings.json
Add typings.json file to the project folder and copy/paste the following:
{
“compilerOptions”: {
“target”: “es5”,
“sourceMap”: true,
“experimentalDecorators”: true,
“emitDecoratorMetadata”: true,
“module”: “commonjs”,
“noImplicitAny”: false,
“removeComments”: true,
“moduleResolution”: “node”,
“outDir”: “built”,
“rootDir”: “.”
},
“exclude”: [
“node_modules”,
“typings/main”,
“typings/main.d.ts”
]
}
{
“ambientDependencies”:
{
“es6-shim”: “github:DefinitelyTyped/DefinitelyTyped/es6-shim/es6-shim.d.ts#6697d6f7dadbf5773cb40ecda35a76027e0783b2”
}
}
6)Creating package.json
To add Angular 2 library into our project we are going to download it using NPM; which will help us with dependencies. Preferably using NPM version 2 to avoid any problems -to check which version you are using you only need to type on the cmd (windows command prompt):
npm -v
If you have a more up to date / advanced version, you can install NPM version 2 typing:
npm install -g npm@2
Creating the the package.json:
npm init
…and answer Enter to every question.
And then….
7) Installing Angular 2
npm install angular2 –save
then…..
npm install systemjs –save
We are going to install also other dependencies listed:
npm install typings –save-dev
Typings: Angular uses TypeScript type definition files — d.ts files — to tell the compiler about the libraries loaded.
npm install concurrently –save-dev
npm install lite-server –save-dev
Lite-server: A package that contains a lightweight development Node.js server that serves a web app, open it in the browser and refresh it when the html or JavaScript change.
After running all those commands above, if you open the package.json, your file should look like this (I will shortly explain the scripts section – I added it manually and it will be useful later):
{
“name”: “test”,
“version”: “1.0.0”,
“description”: “”,
“main”: “index.js”,
“scripts”: {
“postinstall”: “npm run typings install”,
“tsc”: “tsc”,
“tsc:w”: “tsc -w”,
“lite”: “lite-server”,
“app”: “concurrent \”npm run tsc:w\” \”npm run lite\” “,
“typings”: “typings”,
},
“author”: “”,
“license”: “ISC”,
“devDependencies”: {
“concurrently”: “^2.0.0”,
“lite-server”: “^2.2.0”,
“typescript”: “^1.8.10”,
“typings”: “^0.7.12”
},
“dependencies”: {
“angular2”: “^2.0.0-beta.15”,
“es6-shim”: “^0.35.0”,
“reflect-metadata”: “^0.1.2”,
“rxjs”: “^5.0.0-beta.2”,
“zone.js”: “^0.6.10”,
“systemjs”: “0.19.26”
}
}
If have any problems with installation. Copy the above structure and past package.json file. open the cmd (command prompt) and point to the directory of the new folder and then run the follow command: npm install,
• Dependencies” contains all dependencies used in our application to implement the functionality we want to have and we could add other entries for example for bootstrap or jquery.
• “devDependencies” section is listening the dependencies required at development time only.
What about the scripts section?
“scripts” section is where we are defining command shortcuts and it will be executed by npm command.
“scripts”: {
“postinstall”: “npm run typings install”,
“tsc”: “tsc”,
“tsc:w”: “tsc -w”,
“lite”: “lite-server”,
“app”: “concurrent \”npm run tsc:w\” \”npm run lite\” “,
“typings”: “typings”
},
postinstall — called by npm automatically after it successfully completes package installation. This scripttall — called by npm automatically after it successfully completes package installation. This script installs the TypeScript definition files this app requires.
• tsc — It runs one time the TypeScript compiler.
• tsc:w — “-w means watch” enables the watch mode and listen for file changes.
• lite — It runs the static file web server.
• app — It uses concurrently to run the tsc:w and the lite script at the same time. (doing this we can avoid having two commands running in different windows)
• typings — runs the typings tool
To run the command you have to make sure that the current directory is the project folder and then you only need to execute the npm command as follows:
npm run app
Running this command right now will not do anything because we did not create our first Angular 2 component, we setup an Angular 2 environment on which you can now build your entire application.
View the recording of our webinar to gain a better understanding of the AngularJS 2.0benefits and whyshould you move to AngularJS 2.0.