SharePoint Online does not render svg images and html files – How to overcome this?

Chinmoyee

Problem Description:
SharePoint On-premises versions do render .svg and .html files on the browser without any issues (of course with the additional configuration of allowing these MIME types from SharePoint Central Administration). It’s just a minute’s job to create an HTML file in SharePoint On-premises and even, we can embed a good number of controls within an HTML file. And one another component is SVG, which defines vector-based graphics in XML.
Well, SharePoint by default blocks rendering of the above file types in abrowser due to security risk but, at the same time the on-premises version provides an option to unblock this setting. We can either set the browser handling mode to permissive or allow the required mime type for a web application.
Here is the catch now!! The terminology “Web Application” is applicable only for anon-premise environment. But, for SharePoint Online, we don’t have aweb application, rather in online it is called tenant. And there is no tenant level setting to unblock the required mime type. So, in this case in SharePoint Online will always download all HTML, SVG (few other file types), instead of rendering the same in browser. As per MSDN blogs we need to convert HTML files to ASPX format to get it rendered in SharePoint Online. If the count of the HTML files is less, we can perform the exercise of renaming. Even if the count is more, we can write a script to rename the files. But, how will the SVG files be handled?
We were working on a migration project which involved migration from SP 2010 to SharePoint Online and we had more than 7 lakhs of HTML and SVG files in asource environment. And, the SVG graphics were dynamically rendered within HTML files using scripts and there were many cyclic references as well. In short the HTML, SVG, script, CSS files were packaged into one application and within an application there used to be multiple models and, like that there were many applications. All these applications are termed as manuals. Post migration to SharePoint, none if those manuals were rendering in abrowser. We had tried multiple options:
1. Embedding the files within an iframe
2. Converting the HTML files to ASPX. The page gets rendered properly if it has static content. However, if there is any SVG reference within it, instead of opening the file it prompts to download the same.
3. Embedding SVG files with image object
4. Tried executing power shell command to change the browser handling settings to Permissive at document library level. But, it didn’t allow to perform the same as this is a read only property
But, we couldn’t succeed with any of the above options.
Solution Approach:
We had to think outside the box and not confined ourselves Within SharePoint’s boundaries in order to solve the problem. We had both internal and external users registered in our tenant which makes the solution more complicated. All authenticated users should be allowed to access the manuals based on their SharePoint permissions.
Finally, we came up with a brilliant idea of hosting an Azure website with the authentication enabled for the same. We need to activate Azure Subscription for the tenant to create an Azure website. Once, this Azure Subscription is enabled, navigate to Azure portal, create an Azure website and enable Authentication.
1. Navigate to Azure Portal (https://portal.azure.com). Click on App Services ->New tab
Enter all the details and click on Save. This will create your Azure website. So, this completes the first step of setting up Azure website
2. Next step is to enable Authentication, to prevent the website from behaving as anonymous. Select the website created in the above step and click on Authentication/Authorization link placed under Features heading. As I have mentioned above we had both internal and external users, we have selected the option as “Log in with Microsoft Account”. This completes the Configuration of authentication.
But, there was another challenge here. All the files/manuals were security trimmed in SharePoint Online. Now, if we upload any files to the above created Azure website using File Storage, all authenticated users will be able to access. So, the question was how to apply the security trimming for the files housed in Azure, in other words, how do I implement authorization for the content?
Here’s the trick we did. The manuals were not directly accessed from SharePoint library. Instead, the links from the required manuals (from SharePoint library) were added on a link list and item level permission was granted to each link. Our plan was to upload all the manuals to the Azure website and update the corresponding Azure manual link in the SharePoint Online link list. At this stage if the user logins to the SharePoint Online site and access the link list (containing the Azure manual links), he will see the links for which he is granted permission. So, this will work perfectly fine. But, another catch here!! If a user tries to explicitly access an Azure manual link for which he is not granted permission, the Azure website will allow him to access the manual as he is an authenticated user. This forced us to think of a custom solution which will solve the Authorization issue.
For handling Authorization, we ended up implementing a .net solution, which will basically handle the requests to all files hosted in the Azure website. For us, it was basically HTML files, so we created a custom HTTP module.
Before proceeding to implementation part, first, we need to import the published profile for the above created Azure website.
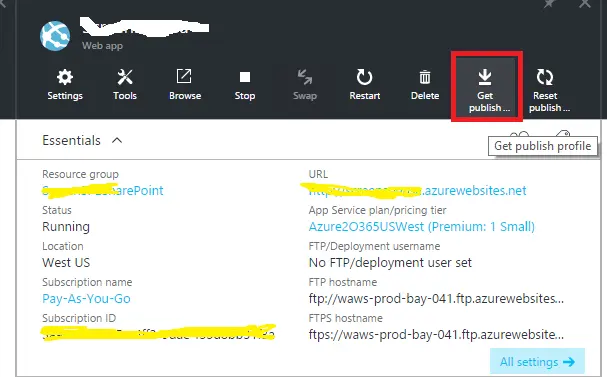
This published profile contains all information required to publish a solution to the website.
Now, let’s move to the coding part.
Create a new ASP.Net web application in Visual Studio. We have implemented using Visual Studio 2013
Next step is to import the above exported published profile. Right-click on the solution and click on Publish. A pop-up will open, click on Import link in the pop up.
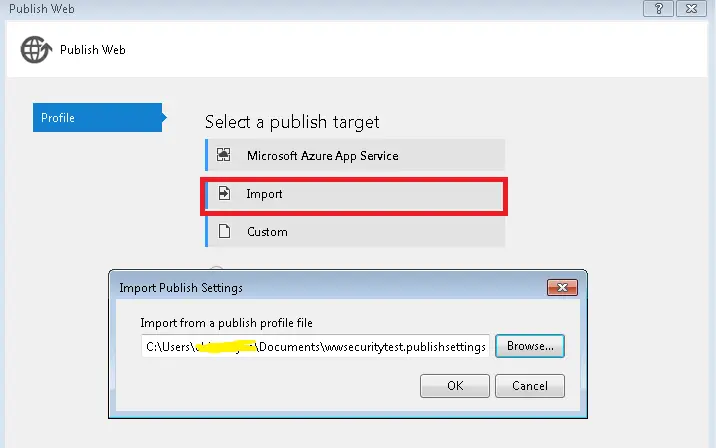
Once it is published, all the required properties from the profile will be displayed on the screen under “Connection” tab. Click on Validate Connection button to check if the connection string imported is proper. And then you can publish the profile. Once this is done, you can see the published profile in your solution.
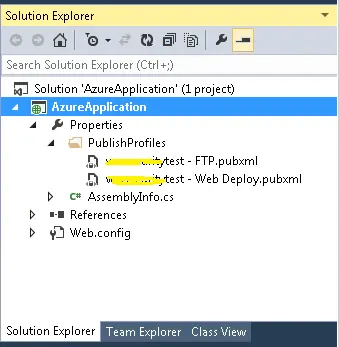
In the above figure, the first profile is for FTP deployment and the second one is for web deployment. You can select the publish method while publishing. In the next step, we need to create a custom HTTP Module class and then register the module by creating an entry in web.config file.

Create the context_AuthorizeRequest method, which hooks up to the AuthorizeRequest event of the HttpApplication. This completes setting up of the custom HTTP module which will handle the authorization.
Here is how the authorization will work-Whenever an Azure manual (HTML) file is accessed via the link in SP Online, the custom HTTP module will be triggered and the module will access the required SharePoint Online resources, checks the permission of the current user and redirect accordingly. All SP Online details (SP Online URL, link list name, username, password) will be stored in web.config file. SharePointOnlineCredentials class will be used to access SharePoint Online resources.
context.Credentials = new SharePointOnlineCredentials (userName, passWord);
Once the context for the SharePoint Online site is created using the above method, we will be able to access the required link list where the links for all manuals are mapped. Here, we will use CamlQuery to check if the manual which the user is hitting exists in the link list. As per our use case, if the manual doesn’t exist we will redirect the user to anunauthorized page. Otherwise, if the manual is mapped, we retrieve the current Azure user identity and create SharePoint Client user using the identity. And then here comes the final step!! We check if the current user has access to the mapped manual link in the SP Online link list, if yes we are allowing the user to view the content and if not, we are redirecting the user to anunauthorized page.

This completes our solution of merging Azure with SP Online to render HTML and SVG files. Next step is to open the Azure website file storage to upload the manuals/files. For that, we need to get the FTP file path, username, and password from the published profile which we exported from the Azure portal. We can either directly open the FTP path from File explorer or we can connect using File Zilla and upload the files. The point to be noted here is we need to upload the files in the virtual directory of the website.
So, finally after uploading the manuals we were able to view the same from SP Online site with single sign on!